
When it comes to maintaining your kitchen appliances, understanding how to replace a cooktop burner igniter can be essential. The igniter plays a crucial role in ensuring the proper functionality of your cooktop. By familiarizing yourself with the steps involved in this process, you can effectively address any issues that may arise with your appliance. Follow this step-by-step guide to replace your cooktop burner igniter and keep your kitchen running smoothly.
Understanding Your Cooktop’s Ignition System
The cooktop’s ignition system comprises essential components like the igniter, responsible for initiating the burner flame. This crucial element ensures the proper functioning of your appliance by sparking the fuel-air mixture when activated. Understanding how the igniter interacts with the burner is key to diagnosing issues and performing maintenance tasks effectively. Familiarizing yourself with these components will empower you to handle any igniter-related issues confidently.
Preparing for Igniter Replacement
Before starting the process of replacing the igniter, make sure to have the following ready:
Tools and Materials You Will Need
Non-contact voltage tester, screwdriver set, adjustable wrench, replacement igniter kit, safety gloves, safety goggles, and user manual are essential tools and materials for replacing a cooktop burner igniter. These items ensure a smooth and safe process, allowing you to effectively manage the task without any complications. Before starting the replacement process, gather all the necessary tools to have everything at hand and streamline the igniter replacement process efficiently.
Safety Precautions Before Starting
Before initiating the igniter replacement process in your cooktop, prioritize safety precautions. Always disconnect the power source and shut off the gas supply to the appliance. Ensure the cooktop has cooled down to prevent any burns during the replacement. Use protective gear like gloves and safety goggles to avoid any injuries. Be cautious while handling tools to prevent accidents and carefully follow the manufacturer’s instructions to ensure a safe replacement process. Always prioritize safety to avoid any mishaps.
Step-by-Step Guide to Replacing the Cooktop Igniter
Now you know the tools needed and safety precautions to take before replacing the cooktop igniter. Let’s delve into the step-by-step guide for a successful replacement process:
Step 1: Shutting Off Power and Gas Supply
Before commencing igniter replacement, prioritize safety by shutting off both the power and gas supply to the cooktop. This precaution prevents any potential hazards when working on the appliance. Ensure the cooktop is completely powered down and disconnected from any gas source to avoid accidents.
Step 2: Removing the Cooktop Grates and Burner Caps
To access the cooktop’s ignition system, start by removing the grates and burner caps carefully. These components are essential for reaching the igniter beneath them. Take your time to ensure no damage occurs during this process. Once these parts are safely set aside, you can proceed with the following steps to replace the faulty igniter. Proper removal of the grates and burner caps is crucial to avoid any complications when accessing and replacing the igniter.
Step 3: Detaching the Cooktop Surface
Carefully lift and remove the cooktop surface, ensuring you disconnect any screws or clips holding it in place. Check for any additional brackets securing it. Avoid excessive force to prevent damage. Place the surface on a secure, flat area to proceed with accessing the internal components. This step is crucial as it provides direct access to the cooktop’s ignition system for further inspection and maintenance.
Step 4: Locating the Faulty Igniter
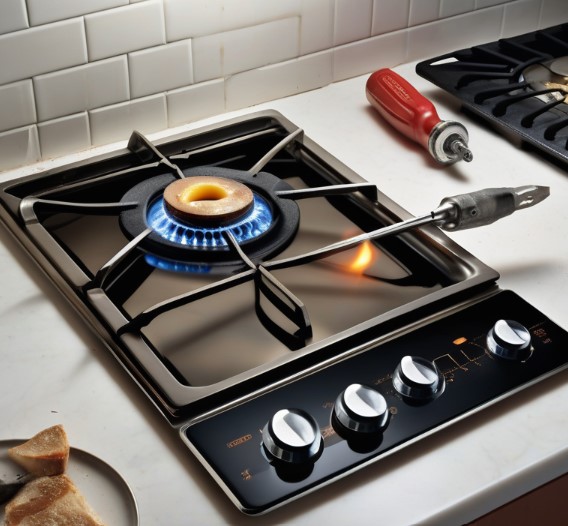
To locate the faulty igniter in your cooktop, start by identifying the burner that is not sparking when you try to ignite it. The igniter is usually located near the burner base, positioned to create a spark to ignite the gas. It’s essential to inspect the igniter for any visible damage or signs of wear. Look for cracks, charring, or any other abnormalities that could indicate a faulty igniter. Identifying the specific igniter needing replacement is crucial for a successful repair.
Step 5: Removing the Old Igniter
To remove the old igniter from your cooktop, carefully disconnect the wires attached to it from the burner. Next, unscrew the mounting screws holding the igniter in place using the appropriate tools. Once the screws are removed, gently pull out the old igniter from its position. Be cautious not to damage any surrounding components during this process. Proper removal ensures a smooth transition to installing the new ignitor seamlessly.
Step 6: Installing the New Igniter
Ensure the new igniter is compatible with your appliance model. Carefully place the new igniter in the designated spot, making sure it aligns correctly. Secure it using any fasteners provided, ensuring a snug fit. Avoid overtightening to prevent damage. Double-check the connections to guarantee proper installation. Following these steps diligently will help restore your cooktop’s functionality efficiently.
Step 7: Reattaching the Cooktop Surface
To reattach the cooktop surface, carefully align it with the appliance, ensuring a secure fit. Gently lower the surface back into place, making sure all components align correctly. Double-check the placement to avoid any misalignment or potential hazards. Secure any fasteners or screws that hold the surface in position, ensuring stability. Take your time during this step to guarantee the cooktop surface is reattached accurately and securely.
Step 8: Reinstalling the Burner Caps and Grates
To reinstall the burner caps and grates, carefully place the burner caps back in their respective positions on the cooktop. Ensure they fit snugly to prevent any gas leaks. Then, gently reposition the grates over the burners, making sure they are properly aligned. Double-check that each component is securely in place before moving on to reconnecting the power and gas supply. Proper installation of the burner caps and grates is crucial for the safe and efficient operation of your cooktop.
Step 9: Reconnecting Power and Gas
To reconnect power and gas after replacing the igniter, carefully follow these crucial steps. Firstly, ensure the cooktop surface is securely in place. Then, reattach the burner caps and grates correctly. Lastly, reconnect the power supply and gas line, ensuring they are securely connected to avoid any leaks or malfunctions. By following these steps diligently, you can safely restore power and gas to your cooktop post-igniter replacement.
Step 10: Testing the New Igniter
After installing the new igniter, it’s crucial to test its functionality. Turn on the power and gas supply carefully. Ignite the burner associated with the replaced igniter. Observe if the burner lights up promptly. Listen for the characteristic clicking sound indicating successful ignition. Ensure there are no gas leaks or unusual smells. Conduct a few test cycles to confirm consistent performance. Safety is paramount during this process to prevent any accidents.
Maintaining Your Cooktop’s Ignition System
Regular maintenance is crucial for your cooktop’s ignition system. Clean the igniter and burner regularly to ensure optimal performance. Check for any signs of wear or malfunction in the igniter and immediately replace if necessary. Additionally, schedule professional appliance maintenance to inspect the entire cooktop for any underlying issues. By taking these proactive steps, you can prolong the lifespan of your cooktop and prevent unexpected breakdowns.
Conclusion
In conclusion, knowing how to replace a cooktop burner igniter is crucial for optimal appliance performance. Regular inspection and prompt replacement of faulty igniters are essential to avoid disruptions in your cooking routine. By understanding the importance of the igniter and following the step-by-step guide for replacement, you can ensure the longevity and efficiency of your cooktop. Remember to stay vigilant for any signs of igniter malfunction and perform routine maintenance to keep your cooktop in top condition. Check out our blog on “The Ultimate Solution to Wolf Cooktop Not Lighting Problem” to solve the lighting issues you may encounter. If you’re unsure about handling the replacement yourself, don’t hesitate to seek professional help from us here at Wolf Appliance Repair Expert to guarantee safety and efficiency in your kitchen.
Frequently Asked Questions
How Often Should I Replace My Cooktop Igniter?
Regular maintenance is key; consider replacing every 2-3 years or if you notice issues like delayed ignition. Keeping track of usage frequency and any unusual behavior can help determine when a replacement is needed to ensure efficient cooktop functionality.
Can I Replace a Cooktop Igniter Myself?
Yes, you can replace a cooktop igniter yourself with the right tools and precautions. Follow our step-by-step guide to safely access, remove, and install a new igniter. Ensure power and gas are off before starting. Regular maintenance tips can help prevent future issues.
Are there different types of igniters available for various cooktop models?
Yes, there are various types of igniters available for different cooktop models, including spark igniters, hot-surface igniters, and pilot lights. Each type functions uniquely based on the cooktop’s design and fuel source, ensuring efficient ignition.